I took a mini vacation from mini munchie and now I am ready to come back with exciting new recipes! Creme Brulee has always been one of my favorite go to desserts on the menu because I always try to order something I can’t make myself. But, you’ll be surprised with how few ingredients this dessert requires and also how easy it is to make it at home! My friend gave me a kitchen torch earlier this year and I was so excited to use it in my baking. I came up with this recipe by experimenting with different types of cream (heavy vs. whipping cream) and also different number of egg yolks. I have come to the conclusion that French desserts are very time consuming and require a ton of patience! Creme Brulee is another great dessert to make ahead of time for a party. They stay fresh for a few days in the fridge. You can always caramelize the top layer of sugar a few hours before serving to retain the crispy texture.

I also want to thank my friend Val for inviting me to use her photo studio to shoot these pictures. I’ve never taken photos on this blog with a tripod and these came out amazing! I think it may be time to invest in a tripod 🙂
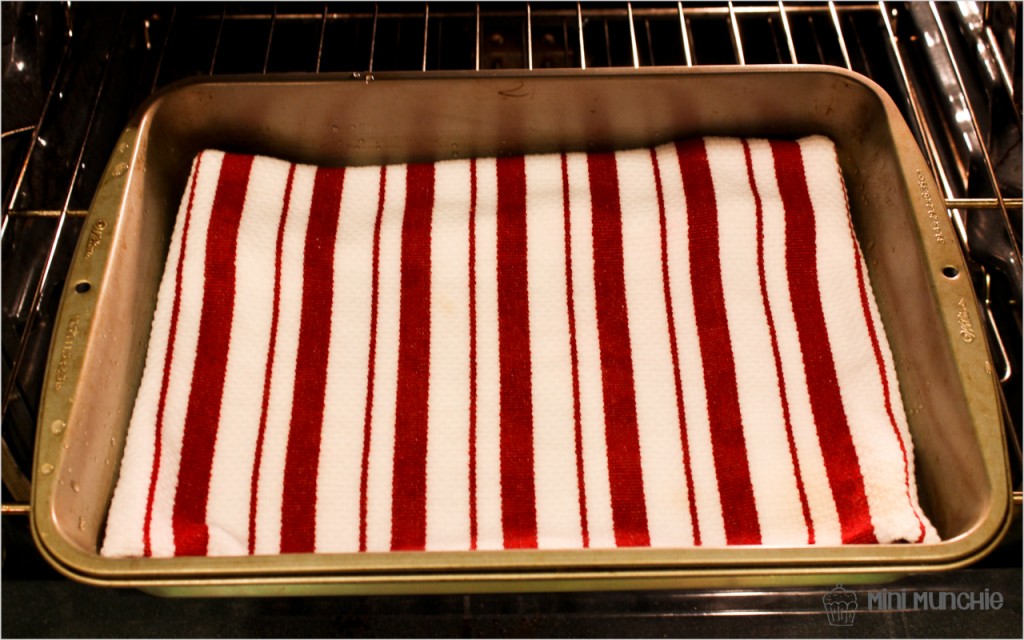
You are probably wondering why there is a red kitchen towel in the baking pan. This step is actually crucial for making creme brulee. I’ve tried baking them in a water bath with the towel and without a towel. The custard was a lot more moist and cooked more evenly with the towel. I wanted to use a white kitchen towel but didn’t happen to have one around so that explains why it’s red! The towel prevents the bottom of the ramekin from being overheated. I also recommend preheating the oven with the baking pan and a damp kitchen towel while you prepare the filling. This will ensure a very hot water bath when you are ready to bake.
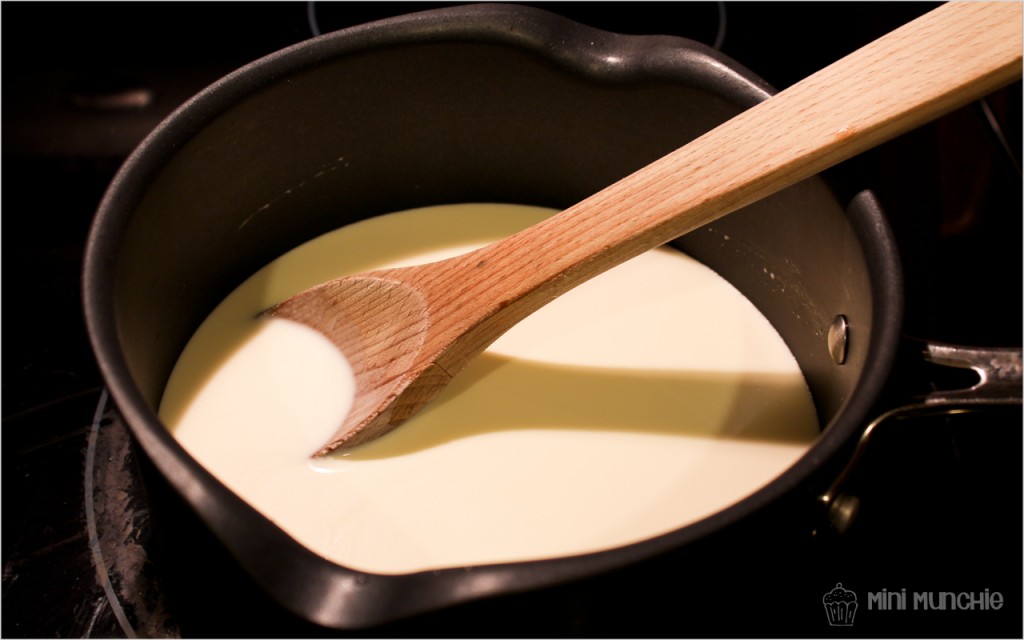
After you are done whisking the yolks and vanilla extract, heat the cream, sugar, and salt over medium heat. You can’t see the steam in the picture above but it is important to remove from heat once you see steam. You do not want bubbles to begin forming or the cream to come to a boil.
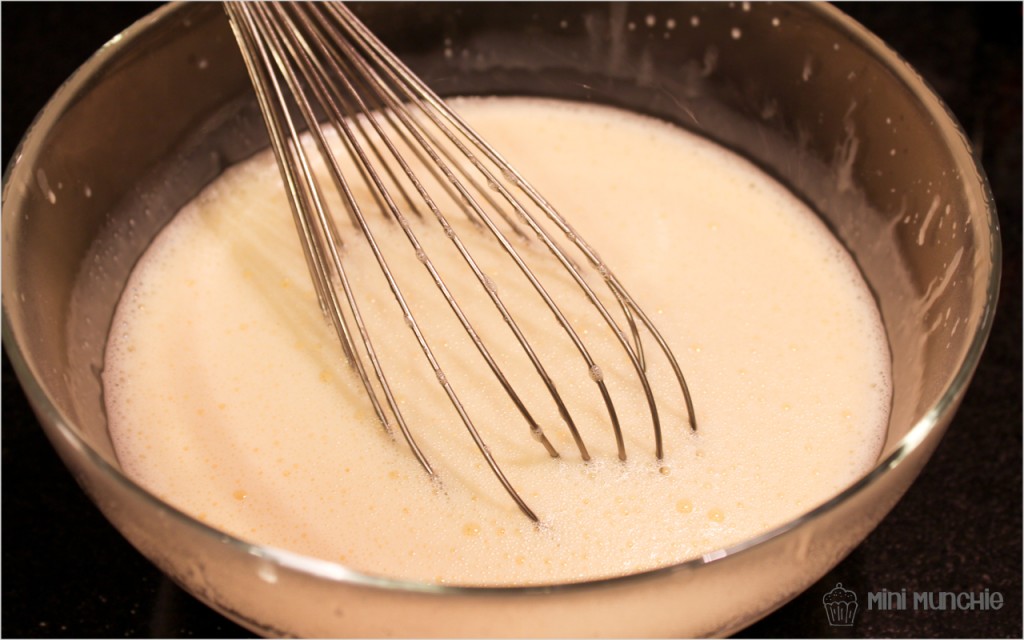
This is is one of the most important and difficult steps (and it’s not even that hard!). You want to slowly pour the hot cream into the yolk mixture while constantly whisking so that the yolks don’t turn into scramble eggs. Once you have combined the cream and yolk mixtures, you will have a filling that is in liquid form with bubbles on top. You want to run the filling through a sieve to remove any lumps. I also suggest scraping off the top layer of foam with a spoon. This will make the surface of your creme brulee look more smooth after baking.
Pour the filling evenly amongst the ramekins and place them on top of the towel in the baking pan. Create a water bath by pouring the boiling water in the baking pan carefully so that water does not get into the ramekins. The baking time will vary based on your oven and also the type of ramekins you use. My ramekins are taller so the baking time is slightly longer. If you have more shallow ramekins, they may be ready sooner, but I would still recommend baking for at least 30 minutes before checking them.
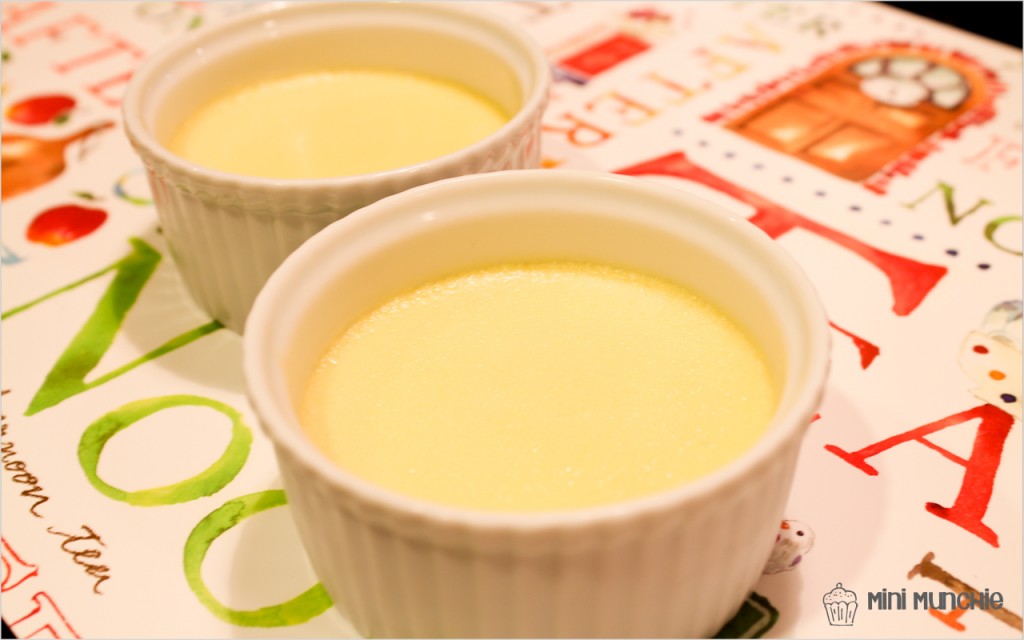
When you remove the ramekins from the oven, the custard should be slightly jiggly. They will continue to set as they chill in the refrigerator. You also want to let the ramekins cool off for at least an hour before putting in the refrigerator. Otherwise the top surface may have condensation on them when you take them out of the fridge. You should let the ramekins chill for at least 4 hours or overnight before caramelizing the top with sugar.
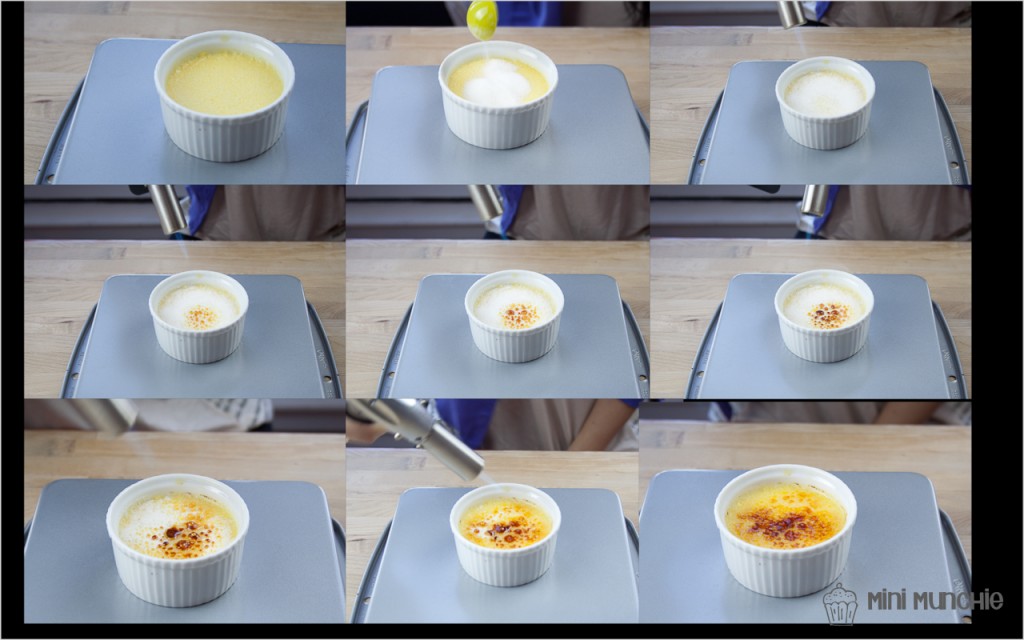
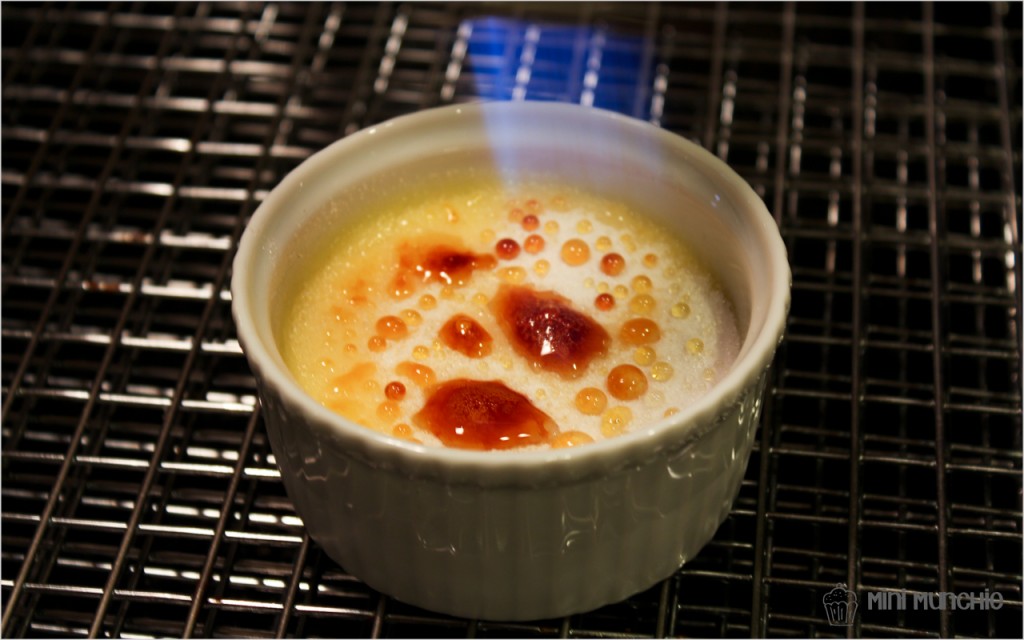
When you are ready to caramelize the top layer of sugar, let the ramekins sit in room temperature for about 20 – 30 minutes first. Then dust the sugar on top as evenly as possible for the best results. Hold the torch farther away from the ramekin to start and adjust the distance as you begin to see the sugar caramelize. If the sugar is not turning brown, move the torch closer to the ramekin and vice versa if the you begin to see it brown too quickly.
After torching, chill the ramekins in the refrigerator for another 20 – 30 minutes as the custard may have warmed up from torching. You can keep the creme brulee that has been caramelized in the refrigerator for a day. I would wait to add the garnish and fruit on top right before serving them.
If you don’t own a kitchen torch, you can caramelize the sugar by placing the ramekins on a baking sheet under the broiler for 2-3 minutes.
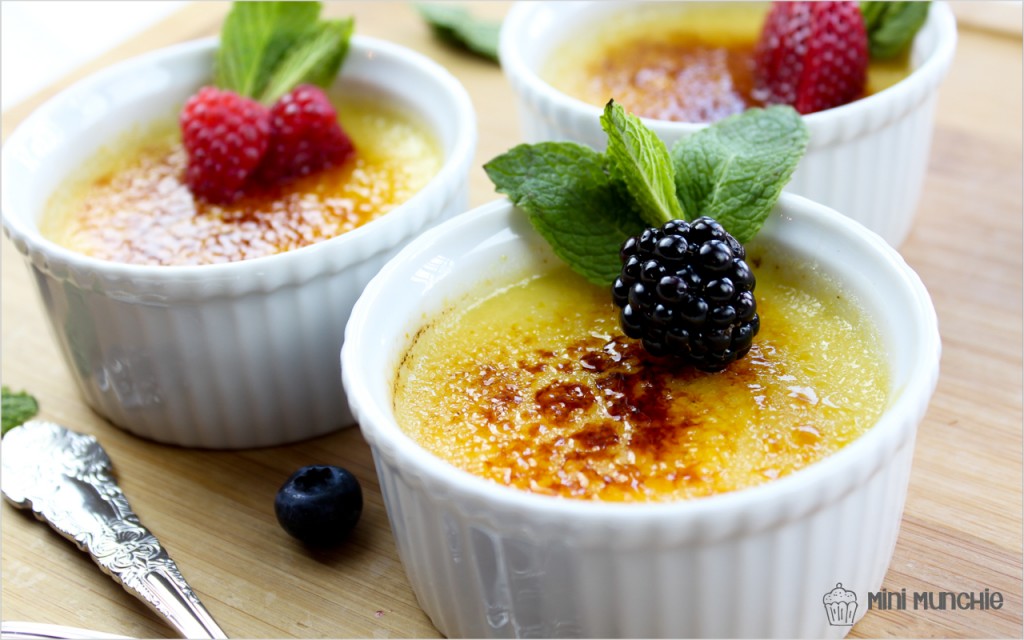
Creme Brulee is a very sweet and rich dessert so it complements well with berries. I enjoy them with tart fruit such as raspberries, blackberries, and blueberries. Try them with your favorite fruit!

Makes 6 five-ounce ramekins
2 cup heavy cream
1/4 cup granulated sugar
5 egg yolks
1 tsp vanilla extract
1/8 tsp salt
3 Tbsp granulated sugar, divided use (for carmelizing sugar on top after custard is set)
berries and mint for garnish (optional)
- Line the bottom of a large baking pan with a damp kitchen towel. Place the baking pan with the towel in the oven and preheat to 300F.
- Bring a large pot of water to boil.
- In a medium bowl, beat egg yolks and vanilla extract together until smooth. The mixture should resemble a pale yellow color.
- In a medium saucepan over medium heat, combine heavy cream, sugar, and salt. Stir constantly for about 5 minutes or until steam rises. Remove from heat once steam rises and before the mixture begins to bubble.
- Pour hot cream over the yolk mixture, very little at a time, whisking constantly to prevent the yolks from cooking. Whisk continuously until all the hot cream is combined with the yolk mixture.
- Run the mixture through a sieve to strain any lumps (there shouldn’t be very much). Then take a spoon and scrape off the top layer of bubbly foam that forms from whisking.
- Pour the filling into each ramekin and distribute evenly.
- Place the filled ramekins on top of the kitchen towel in the baking pan. To create a water bath, pour the hot boiling water into the baking pan slowly and carefully so that the water does not get into any of the ramekins. The hot water should come up to half way up the sides of the ramekins.
- Bake for about 40 to 45 minutes until the custard is almost set. It should be slightly jiggly when you shake the ramekins lightly.
- Cool the ramekins on a wire rack for at least an hour before chilling them in the refrigerator. Chill the ramekins in a covered container for at least 4 hours or overnight.
- When you are ready to to torch the sugar on top, remove the ramekins from the refrigerator and let it sit for 20-30 minutes. Then sprinkle about 1 + 1/2 tsp of granulated as evenly as possible on top of each surface.
- In small and circular motions, torch the sugar so that it melts slowly without it burning too quickly. If you see an area darken quickly, hold the torch further back and move around more.
- Place the creme brulee back into the fridge from another 20-30 minutes before serving (to cool off the custard again after being slightly warmed up from torching the sugar on top). When cooled, garnish with mint and serve with your choice of fruit on top!
Leave a Reply